Code Structure
Everything in it’s place
When I first started out one of the hardest things to learn was how to structure my code base. There are countless opinions on where code should live, but all share the same core concept - It should be easy to find your way to any part of the code base even if you aren’t familiar with it. This means the structure should be consistent. It will never be perfect, but if it’s structured consistently then when you get assigned to fix a bug you should be able to quickly navigate to that part of the code base without relying on any sort of specialised knowledge of the code base.
We’ve all seen projects with spaghetti code, chances are we’ve all built projects with spaghetti code, and every time we get assigned to write a new feature or fix a bug we dread getting started. The code may not necessarily be bad, but it’s unorganised and hard to follow.
Contrast that with a well organised project where a bug becomes apparent, and you’re assigned to it. Instead of spending half a day discovering where the bug exists in code you spend 5 minutes quickly going through the functions surrounding the bug, the next 10 minutes writing tests, then another 15 minutes fixing and verifying. All because you were able to jump straight to where you expected the code to be and get to work pretty much instantly.
One of the earlier Android native projects I was working on had a god class which pretty much every other class in the project extended from. This god class had functions which called out to Amazon Web Services, connected to web sockets, controlled animations and navigation within the app etc. We would receive odd bugs because a button was receiving and handling user events and such like. Eventually me and the other Android developer on the project decided to stop work on all new features and bugs and spend 3 weeks restructuring the code base until we could delete the god class entirely. We went from 2 weeks for each new feature (with hidden bugs which were hard to track) to 1-2 days for each new feature, with very tightly focused classes which were easy to debug.
With all that said code structure comes down to “A place for everything, and everything in it’s place”, a common saying when organising your tools which applies to organising your code.
Common Structures
Most projects these days follow some variation of MVC/MVVM. There are exceptions, and I’m speaking mainly from a mobile developer point of view, but overall these are just conventions for structuring code. Let’s take a typical example for how I currently structure a Flutter app:
- app/
-- core/
--- api/
---- user/
----- user_api.dart
----- dummy_user_api.dart
----- remote_user_api.dart
--- service/
---- user_service.dart
-- ui/
--- page/
---- base/
----- base_page.dart
----- base_view_model.dart
---- home/
----- home_page.dart
----- home_view_model.dart
--- widget/
---- user/
----- user_list_item.dart
----- user_list_item_view_model.dart
-- app.dart
This is a rough approximation of how we structure our code for projects, we separate Core and UI and place our Views and ViewModels together. If there is a problem displaying a user on the home page it’s very simple to navigate to the home page class and then drill down through the layers to find the issue, the structure is consistent and this helps with making any other projects feel familiar even if you’ve not worked on them before. Most projects I’ve worked on which are structured well end up as a variation on this theme.
Separation of Concerns
This is the main benefit of structuring your code properly. Each class has a specific job and does that job well, there are no god classes, any base classes are just for eliminating boilerplate and are very sparse, and each function is well-defined and easily testable. If you stick to this then you’ll have a much easier time writing and maintaining code throughout your professional life.
Restructuring the Flutter Example App
The Flutter example app is a good app to show how to restructure a project for consistency in MVVM. So let’s do that! It may seem overkill on such a simple app (and it is) but it will showcase how to set up your app so that future additions have clearly defined places to live.
Getting started
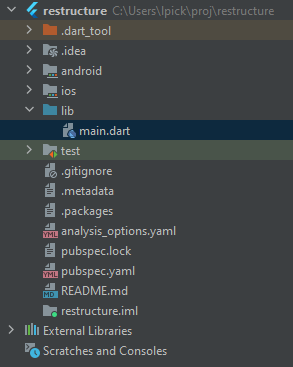
Open up Android Studio or VSCode and create a new Flutter app. If you’re unsure how to do this then check out the official Flutter Docs which have a great Getting Started section. If you’re using command line and have Flutter already installed then navigate to a new directory and run the command flutter create restructure to create the starter app. I’m currently running Flutter 2.8.1, this start app may change in future versions. You should have a folder structure like this:
Base View and ViewModel
The first thing we need to do is separate out any view logic with view model logic, and we can use Providers for this. Let’s go ahead and create our BaseView and BaseViewModel. These will hold common logic which all Views and ViewModels will share. We want to create a new directory inside lib/ called ui/page/base with base_view.dart and base_view_model.dart, with BaseView extending StatefulWidget and BaseViewModel extending ChangeNotifier:
import 'package:flutter/widgets.dart';

class BaseView extends StatefulWidget {
  const BaseView({Key? key}) : super(key: key);

  @override
  _BaseViewState createState() => _BaseViewState();
}

class _BaseViewState extends State<BaseView> {
  @override
  Widget build(BuildContext context) {
    return Container();
  }
}
import 'package:flutter/foundation.dart';

class BaseViewModel extends ChangeNotifier {

}
Let’s sort out the BaseViewModel first as that is the simplest. We want to be able to set the ViewModel to Busy or Idle and then notify anything listening about this change. As it already extends ChangeNotifier then we can call notifyListeners() to tell any listeners that there are changes, so we just need to create a State enum to provide something to track. In the same base folder create a new file called view_state.dart and provide the following:
enum ViewState {
  busy,
  idle
}
Then we’ll update the BaseViewModel to track state and expose a getter for the state for any listeners:
import 'package:flutter/foundation.dart';
import 'package:restructure/ui/page/base/view_state.dart';

abstract class BaseViewModel extends ChangeNotifier {
  ViewState _state = ViewState.idle;

  ViewState get state => _state;

  bool get isBusy => state == ViewState.busy;

  bool get isIdle => state == ViewState.idle;

  void setState(ViewState state) {
    _state = state;
    notifyListeners();
  }

  void setBusy() {
    _state = ViewState.busy;
  }

  void setIdle() {
    _state = ViewState.idle;
    notifyListeners();
  }
}
Now let’s organise the BaseView to take a BaseViewModel and listen to state changes. First we’ll set the BaseView to be of a type BaseViewModel:
abstract class BaseView<T extends BaseViewModel> extends StatefulWidget { ... }
Next we need to add a builder Function so that the ViewModel can be generated and used by the view correctly:
abstract class BaseView<T extends BaseViewModel> extends StatefulWidget {
    final Widget Function(BuildContext context, T value, Widget? child) builder;
    ...
}
We will also need to update the _BaseViewState now to match the signature of BaseView:
class _BaseViewState<T extends BaseViewModel> extends State<BaseView<T>> { ... }
We’re going to need to be able to create our ViewModel when this View is created, so we need a way to tell our code how to do this. Our apps use GetIt which is a simple IoC Container. If you’re not sure what this is, it is a class which you can pass in instructions to generate objects in your code, and later you can ask it for one of those objects. The objects may be ViewModels, Services, Apis, anything, but the important thing is that there is only 1 place where these objects are created so that they can be easily swapped out later if required.
We will also need a way to allow our View to listen for changes in our ViewModel, which we can do via the Provider package. This simply allows us to react to changes in the ViewModel when notifyListeners() is called.
For this example we’re using get_it version 7.0.0 and provider version 5.0.0, so add the following line to your dependencies section in your pubspec.yaml and run flutter pub get in the terminal to download the library:
dependencies:
  get_it: ^7.0.0
  provider: ^5.0.0
Once this is in create a new file at lib/locator.dart and add the following:
import 'package:get_it/get_it.dart';

GetIt locator = GetIt.instance;

void setupLocator() {}
We’ll populate setupLocator() later when we have some classes to generate. Going back to your BaseView we can now ask for a ViewModel from our locator and use this going forward. Complete the class as follows:
import 'package:flutter/widgets.dart';
import 'package:provider/provider.dart';
import 'package:restructure/locator.dart';
import 'package:restructure/ui/page/base/base_view_model.dart';

abstract class BaseView<T extends BaseViewModel> extends StatefulWidget {
  final Widget Function(BuildContext context, T value, Widget? child) builder;

  const BaseView({Key? key, required this.builder}) : super(key: key);

  @override
  _BaseViewState<T> createState() => _BaseViewState<T>();
}

class _BaseViewState<T extends BaseViewModel> extends State<BaseView<T>> {
  final T _viewModel = locator<T>();

  @override
  Widget build(BuildContext context) {
    return ChangeNotifierProvider<T>(
      create: (context) => _viewModel,
      child: Consumer<T>(
        builder: widget.builder,
      ),
    );
  }
}
The Home Page
With our BaseView and BaseViewModel setup let’s go about separating out our Home Page into our desired structure. Create two new classes in ui/page/home of home_page.dart and home_view_model.dart and let’s move all the home page code from main.dart into home_page.dart for now:
import 'package:flutter/material.dart';

class HomePage extends StatefulWidget {
  const HomePage({Key? key, required this.title}) : super(key: key);
  final String title;

  @override
  State<HomePage> createState() => _HomePageState();
}

class _HomePageState extends State<HomePage> {
  int _counter = 0;

  void _incrementCounter() {
    setState(() {
      _counter++;
    });
  }

  @override
  Widget build(BuildContext context) {
    return Scaffold(
      appBar: AppBar(
        title: Text(widget.title),
      ),
      body: Center(
        child: Column(
          mainAxisAlignment: MainAxisAlignment.center,
          children: <Widget>[
            const Text(
              'You have pushed the button this many times:',
            ),
            Text(
              '$_counter',
              style: Theme.of(context).textTheme.headline4,
            ),
          ],
        ),
      ),
      floatingActionButton: FloatingActionButton(
        onPressed: _incrementCounter,
        tooltip: 'Increment',
        child: const Icon(Icons.add),
      ),
    );
  }
}
Next let’s move all state related code from the HomePage into the HomeViewModel:
import 'package:restructure/ui/page/base/base_view_model.dart';

class HomeViewModel extends BaseViewModel {
  int _counter = 0;

  int get counter => _counter;

  void incrementCounter() {
    setBusy();
    _counter++;
    setIdle();
  }
}
Now this is done we can make HomePage a StatelessWidget and use our BaseView to connect the HomeViewModel up:
import 'package:flutter/material.dart';
import 'package:restructure/ui/page/base/base_view.dart';
import 'package:restructure/ui/page/home/home_view_model.dart';

class HomePage extends StatelessWidget {
  const HomePage({Key? key, required this.title}) : super(key: key);
  final String title;

  @override
  Widget build(BuildContext context) {
    return BaseView<HomeViewModel>(
      builder: (context, model, child) => Scaffold(
        appBar: AppBar(
          title: Text(title),
        ),
        body: Center(
          child: Column(
            mainAxisAlignment: MainAxisAlignment.center,
            children: <Widget>[
              const Text(
                'You have pushed the button this many times:',
              ),
              Text(
                '${model.counter}',
                style: Theme.of(context).textTheme.headline4,
              ),
            ],
          ),
        ),
        floatingActionButton: FloatingActionButton(
          onPressed: () => model.incrementCounter(),
          tooltip: 'Increment',
          child: const Icon(Icons.add),
        ),
      ),
    );
  }
}
This won’t work yet as the locator still doesn’t know how to create a HomeViewModel, so go to the locator class and add the following line to the setupLocator() function:
locator.registerFactory(() => HomeViewModel());
We want to register ViewModels as a factory so a new ViewModel is created each time one is requested. For things like APIs, HttpClients, Services you’d register them as a Singleton, so that the same object is returned each time as these should not contain state and be purely functional.
We still need to call the setupLocator() function or this code won’t work, so to do this we go to main.dart and change the main() function to the following:
void main() {
  setupLocator();
  runApp(const MyApp());
}
This is our entry point to the app, so we want the locator to be ready to go before the app tries to use it for anything, otherwise we’ll be hitting runtime exceptions when we load the HomePage and the HomeViewModel hasn’t been registered yet.
Final Structure
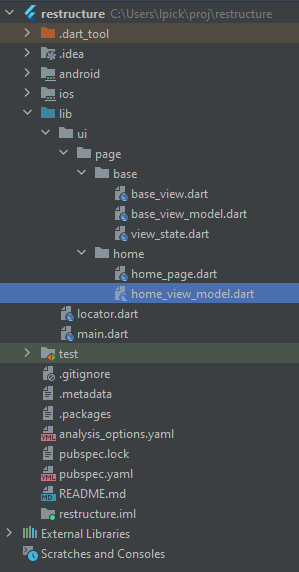
Now you should have the following structure for the sample Flutter app:
This is enough for the sample app, in future posts I’ll be showing how to create more complex applications with additional layers such as Model, API, Service, Providers and how they are structured to keep code duplication to a minimum, be easily testable and make it easy to update your code with new features.